THE MONASTIC PRECINCT - THE WATER TOWER
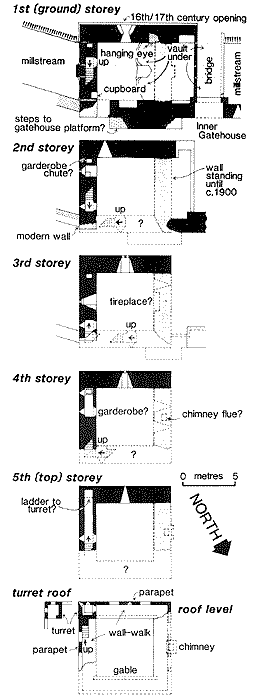
Water Tower is built across the millstream, projecting entirely into Burgess Court. The stream flowed beneath it through two barrel-vaulted tunnels, with a buttress supporting the east wall between them (Figure 5). The tunnels are visible where the western floor of the tower has collapsed. Water Tower is the most ruinous tower in the priory, its west and north walls having fallen away. However, a nineteenth century photograph records the west wall still standing and demonstrates that the broad buttress against the free end of the east wall is modern.
The tower's name may simply come from its position over the millstream.1 Yet, with several drains emptying downstream of the tower to the east, Water Tower may have been the priory well-house, drawing water from the stream below. If so, the well would have been in the northwest corner of the tower, well away from the garderobe in the opposite corner. The well-house may alternatively have been in the enclosed space between the tower and the millstream bridge. A drawing of 1836, reproduced by Harbison, shows this space still covered by a penthouse roof.
Water Tower is the largest priory tower (Figures 5,8). It is at least twice the size of any Burgess Court tower and is larger than Prior's Tower, providing substantial accommodation on its upper floors. It may have been used by the priory garrison or servants, but its scale seems to argue against this. Perhaps a more likely alternative is that this modern tower house was used to supplement or to replace the existing priory guesthouse.
Like the towers in Burgess Court, Water Tower has five storeys. A ground level door from the Precinct enters a store-room with an outward-splaying slit window in its south wall. The only surviving wall-cupboard in the tower is in the east wall of the store-room and there is a larger recess in the north wall alongside the entrance.
The south wall of this room incorporates a hanging eye near ceiling-level at the west end. A column of squared stones below it, and perhaps the springers of a wide arch above it, suggest that this wall occupies the site of an older gateway. The fifteenth century tower probably replaces an earlier gate-tower which bridged the stream - entry to the original priory being through the earlier tower.
The stairway to the second storey is entered near the centre of the east wall and climbs a mural passage towards the northeast angle of the tower. The second storey room has narrow slit windows on either side of the southeast corner, the eastern one with a narrow un splayed embrasure.
The stairs to the third storey appear to have been within the missing north wall, presumably turning the northeast angle to reach the door preserved at that end of the east wall. The third storey room was lit by a single-light ogee-headed window in the east wall and a twin-light ogee-headed window with a rectangular external frame in the south wall. The larger surviving window has stone benches in its internal embrasure. The nineteenth century photograph indicates a third window, shrouded in ivy, at the southern end of the west wall (perhaps beside a fireplace).
The fourth storey must again have been reached from stairs in the north wall, these continuing to the top floor around the northeast angle of the tower. The upper steps can be seen from below where the passage is open at the fallen end of the east wall. The fourth storey room was presumably entered through the doorway at the east end of the north wall (only a single door jamb survives today). A passage from the centre of the east wall probably leads to a garderobe towards the southeast angle of the tower where there is a second narrow slit in the outer face of the wall.
Only an ogee-headed window in the south wall remains of the windows
which once lit the room on the fourth floor. The old photograph1 also shows a pair of closely spaced single-light
windows at the centre of the fallen west wall. A fireplace at the middle of the west wall of the room below might
account for the spacing of these windows, one on either side of a flue (an arrangement repeated in Prior's Tower).
The south window has a square hood moulding above its external face and stone window seats grace its internal embrasure.
The top storey room was probably entered by the doorway near the centre of the east wall. The passage in the east
wall appears to continue towards the southeast angle from where there may have been ladder access into the turret
above through a trap-door. The top floor has a round-headed window in the south wall and had none in the west wall.1
Any other windows must have looked out over the Precinct to the north.
The roof level parapet is preserved in part on the east wall and completely on the south wall where the centre
merlon is pierced by an arrow slit. Free-standing gables rose behind both north and south parapets of this tower,
with a chimney probably above the west parapet. The small turret at the southeast corner is lit by two arrow slits,
one in the south wall and another in the southeast angle - an angle loop2 (or slit). It exits onto the south wall-walk
and the turret roof was reached, apparently by ladder, from the other end of the wall-walk. The turret parapet
is crenellated on the east and south sides.

Figure 5. WATER TOWER:
Serial sections illustrating the tower's internal layout;
including details of the fallen west wall. Details of the north wall are inferred from the other features. Scale
is approximate.
(c) Daniel Tietzsch-Tyler